Saturday 14 February 2015

Nail Art Stickers Nail Art Designs Ideas Tutorial Step By Step Images Christmas Flowers Pictures 2015

Nail Art Stickers Biography

Source(google.com.pk)

There are many types of nail stickers available in the market nowadays! They are quite pocket friendly and easy to apply on your nails. You can get these gorgeous nails in less time by using pre-designed stickers. Also they are god-send for those nail art lovers who can’t create free hand designs!

Each type of sticker has a different method of application. You can easily apply these stickers on your both hands yourself with zero error. However, sometimes it may become very difficult to do nail art on your hand with non dominant hand.

Different Types Of Nail Art Stickers:
Different types of sticker are elaborated on below. Try them for maximum results.

Type 1: Plain stickers with adhesive backing
These come in a variety of designs from flowers to cartoon nail art .They are very easy to apply, just peel and stick. You just have to be creative and there is no limit of beautiful manicures you can get. They are very pocket friendly.  I recently had used angry bird stickers to create this blue angry bird nail art.

Type 2: Lace nail art stickers
Lace nail art stickers are very smilar to above nail art stickers but the only difference they come in stripes . You have to cut the lace sticker according to your requirement and then stick it on your nails. They also come in many designs and colors. I used  two different types of lace patterns to create this look. They really look gorgeous when you apply them.

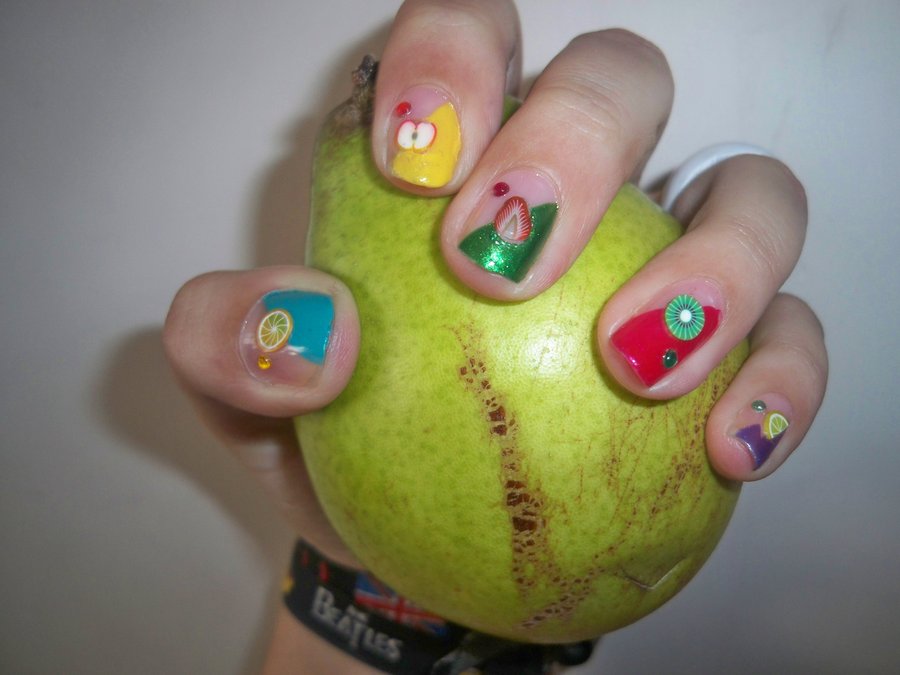
Type 3: 3D nail stickers
They have 3d effect to them. They too have adhesive backing and they can applied by just peel and stick method.They come in many designs and look very beautiful! Especially the floral ones.

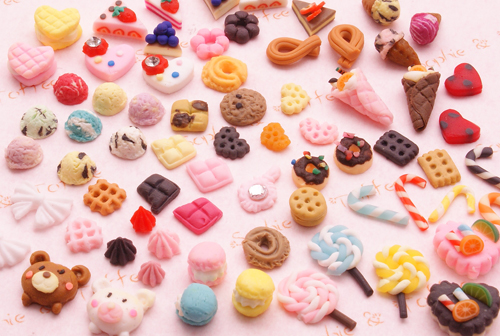
Type 4: Fimo nail stickers
These stickers are made up of polymer clay and they come in so many cute designs. These are available in the form of sticks or pre-cut shapes. For sticks, first you have to cut them as thinly as you can, then stick them to your nails. You can stick them using good clear nail paint or using nail glue.
Precut fimo pieces are stored in wheels where can you see the variety of designs they come in. (this pic is of my personal fimo stash)

Type 5: Metal nail art stickers
As the name suggests they are made up of metal and they too come in many designs. They can be used for creating accent nails in your manicure. They are stuck using nail glue and are also known as metal decals.
 fimo nail stickers 3
These wheels contain many 3d nail stickers including metal, fimo and acrylic stickers.

Type 6: Acrylic nail art stickers
Acrylic nail art stickers are same as metal ones, the only difference is they are made of acrylics. They look very chick and beautiful.
 acrylic nail art stickers 1
I used acrylic bow to create this nail design. It did not really consume much time. They are quite easy to do, once you get a knack of it.

Type 7: 3D silica gel stickers
They are made of silica gel and they are very soft and bendable. You need a good clear polish or nail glue to stick them on your nails.

Type 8: Full nail stickers
These stickers are for covering your whole nail and though they are easy to apply, you still need some practice to get them right.

Type 9: Gel full nail stickers
They have two layers and gel like material is filled between these two layers. I have not used them yet but I have one set of these stickers.

Type 10: French tip sticker and French tip guides
French tip sticker covers the nail tips and they are used to create very beautiful nail art patterns. They come in many designs.  French tips are also a form of stickers which serve as a guide to create French tips, they are removed after painting the tip.
 french tip sticker and french tip guides
French tip nail art stickers  are applied using peel and stick method and they cover only the tips of your nail you can adjust their size by filing the excess

Type 11: Water slide nail stickers or water decals
You have to dip them in water first to remove their back sheet and transfer them to your nails. They come in many designs for full nails too.

Nail Art Stickers Nail Art Designs Ideas Tutorial Step By Step Images Christmas Flowers Pictures 2015 

Konad Nail ArtNail Art Designs Ideas Tutorial Step By Step Images Christmas Flowers Pictures 2015

Konad Nail Art

Source(google.com.pk)

Nail stamping is amazing! There are literally hundreds of image plates to choose from and sometimes you can find them on ebay for a very good price. The main manufactuer is Konad but there is also Bundle Monster. If you're looking to buy, your best bet is Ebay and Amazon. You can find nail stamping image plates on Amazon for half the price of the other sites. I paid too much for my sets...don't get burned!

What you need to get started is an image plate, a stamper and scraper and a "konad special polish". You can buy starter kits that include all the basics for around $20. It may seem like a lot of buying tools and accessories but the result is so worth it. You can create looks beyond your wildest dreams and the best part is...it's fast! For this tutorial I used Konad Plate M57, a must-have in my opinion.

tips & tricks:
You don't have to use konad special polishes. What makes them so special is that they are very, very opaque. Any polish that goes on opaque with one coat should work. Try out some polishes in your collection and see how they work, I've had good results with Sally Hansen Nail FX.
Lost your scraper? Don't fret, a gift card will do the trick.
Work fast! The polish starts to dry as soon as you paint it on the plate.
Try and try again. As first, I couldn't for the life of me get my stamps to line up properly on my nails. You will get better with practise.
When applying your top coat, use good amount and don't brush it over and over. Do one clean swipe, and do a second coat when dry if you need to.
Hold the scraper at a 45 degree angle when you scrape.
You don't neccesarily have to clean your stamper and plate in between each nail. Use your judgement.
Feeling a bit confused? Watch my video tutorial to wrap your head around it all. Skip ahead to 6:30 to get to the nail stamping.

I love hand painted nail art, but some designs are just too intricate to paint. That's where this nail wrap tutorial comes in! When I first got really into nail art I thought of wraps as "cheating" or "lazy" and I've never been so wrong! They're a way to broaden your nail horizons and rock amazing designs you just couldn't have otherwise. These wraps were send to me by the amazing people at Nail Polish Canada and I am so thankful to them for opening my eyes to the possibilites wraps offer! (Seriously, go visit Nail Polish Canada. It's my favorite place to buy nail polish and they are SO not paying me to say this, I'm just a huge fan of the site!)

In this tutorial I used OPI Nail Envy as a base, NCLA nail wraps in Top Down, Volume Up and Seche Vite top coat for shine!

tips & tricks:
Prep your nails properly before application. File your nails into a nice shape and push back your cuticles! It will make it much easier to apply the wrap straight and centered.
If you're torn between two sizes it's better to go for the smaller one. It's possible to trim wraps but it's tricky and you can end up with wonky lines!
Some wrap brands have different prep routines. These NCLA wraps suggest a base coat before the wrap, while Nail Rock requires you the buff the nail to remove shine. I personally prefer using a base coat to buffing and thinning my natural nail! ;)
Write down which wrap fits which nail for next time. Take a sharpie and write "index", "middle" etc. over the empty sticker space.
If you're getting a lot of wrinkles, your wrap might be too big. Try a smaller size.
Don't be afraid to pull back the side walls and really push the wrap down!

Leopard nail art is fun, easy and versatile. You can do a shimmery gold leopard print, a funky neon color combo or go for soft and pretty with pastels. It's a relatively quick and easy look to achieve, and the finished product is so damn cute.

tips & tricks:
Don't stress about it being perfect. In the wild the patterns aren't perfect! If you have a jagged edge or funny shaped blob, it will look totally legit!
For this tutorial I used a thin brush, but a nail art pen would work as well.
If you hate freehand painting, Konad's M57 stamp has an adorable leopard print image. Here's an example of that look. A little different than the freehand leopard nail art, but still very fun. The stamping tutorial will walk you through the steps to getting that look.
Don't worry if it looks a little "bumpy" when you're painting on the "c" shapes, a couple coats of top coat will sort that right out!

Konad Nail ArtNail Art Designs Ideas Tutorial Step By Step Images Christmas Flowers Pictures 2015 

Friday 13 February 2015

Nail Art Supplies Nail Art Designs Ideas Tutorial Step By Step Images Christmas Flowers Pictures 2015

Nail Art Supplies Biography

Source(google.com.pk)

NAIL ART SUPPLIES:

The right nail art supplies are essential This article will talk you through the basic tools so you can make an educated purchase and start building your nail art kit. Of course, there's so rule saying you need all of the products listed here but nail art collections tend to grow pretty quickly! If you're looking for some good website to buy from I've compiled a list of my favorite places to shop.

A basic tool in any kit is brushes. You can get really nice sets of brushes just about anywhere and at any price range. I got mine on Amazon that I wish I'd seen earlier. The most important ones are a long thin brush for striping and a shorter thin one for detail painting. Read more about buying & caring for brushes...

Supreme Nail Pens If you're into detail work, you should invest in some nail art pens. Nail art pens completely changed my life! No more daily brush cleaning and the detail you can achieve with them is amazing. If there's one product I would reccomend buying, it's pens. For a more detailed breakdown of the different brands and prices, visit the Nail Art Pens page.

Glass nail fileOh, where to begin with nail files!? There are three different basic choices for nail files: Emery Boards, Metal Files and Glass Files. First off...don't buy a metal file. Nail files come in a variety of grits, just like sandpaper. There should be a "grit number" on the file. The higher the number, the finer the grit. Ideally you want a two sided file with a rougher side for the down and dirty work and a finer side for smoothing and simple clean ups. Anything below 180 grit is too rough for natural nails, so make sure you check.
Check out my guide on how to file your nails properly

D0tting Tool A Dotting Tool, or ideally a set of different sizes, is so convenient to have, but you can make do without them. Some other things that work are bobby pins (which I used in the Floral Nails Tutorial), pin heads, dried out pens, the ends of brushes or toothpicks. Soon you'll find yourself looking around the house for tiny round things you can stick in nail polish! But all that aside, having a real dotting tool is much better and for less than $5, why not?

Image PlateIf you've read the stamping tutorial you're probably curious about nail stamps. The first stamps, and arguably the best, were made by Konad. There's many other brands of plates out there, such as Bundle Monster or Shany. You can even buy stampers and scrapers in drug stores these days! The biggest tip I can give you if you're buying some image plates is buy them on amazon. You can usually get them cheaper than what's charged on the "official sites". Aside from the plates all you need is a stamper, a scraper and you're ready to go.

Fimo caneFimo is made from polymer clay and is sold in "canes" that look like a log of that Pilsbury cookie dough that has pictures in it. You can buy a whole cane and slice it yourself, but ask yourself if you really need 300 slices of lemons, or buy pre-sliced pieces. If you slice them yourself you need to use a very sharp razor blade (you can get them through nail art supplies stores) and please don't cut your finger off. That's one less nail to paint! Fimo is really popular, so you can find canes all over for decent prices. One of my favorite places to buy fimo pieces is Etsy because people get so creative and I love to support small business owners.

3d nail art bowsThere is endless options when it comes to cute little plastic decorations and rhinestones. Like most of the products mentioned in this article, you can find them easily on the internet but the price can vary quite dramatically so shop around a bit before you purchase.

Pure AcetoneOne product that I think every nail artist should have is 100% Pure Acetone. Most nail polish removers have acetone in them, but pure acetone is way more intense! It's really helpful when it comes to cleaning up any polish on your skin or removing stubborn glitter polishes. It's quite drying, though, so make sure you always apply cuticle oil after the acetone.

Nail Art Supplies Nail Art Designs Ideas Tutorial Step By Step Images Christmas Flowers Pictures 2015

Nail Art Pen Nail Art Designs Ideas Tutorial Step By Step Images Christmas Flowers Pictures 2015

Nail Art Pen Biography

Source(google.com.pk)

7 Ways how to use nail art pens:

1.Shake the nail pen with the cap on. You should be able to hear the cartridges move together inside of the pen. You only need to shake the pen a few times.
2.Take the cap off. Press the tip of the pen against a hard surface all the way down. Keep doing this until some of the ink forms at the base of the tip and you can draw a steady line onto your nail without trouble. Just test out a few lines and dots. You can even keep practicing designs until you're comfortable with using the pen.
3.Use nail polish remover. Use a q tip or folded toilet paper to remove the nail pen tests or any nail polish residue from past manicures.
4.Apply a base coat. You'll need a clear base coat on your nails first before using the nail pen or polish if you're going to use any. Wait for the base coat to dry.
5.Choose on whether you want a background color or not. You can use any color nail polish you want for a solid background to make the nail pen designs stand out, or just leave your nails as they are with the base coat. If you chose to paint your nails, choose a color that will make the nail pen stand out and correspond well with the color. If you're using a white nail pen for example, try using dark colors like crimson, black, violet, or navy blue. Start painting a strip from the cuticle to the tip of your nail, going from left to right until you've painted the entire nail. Use a q tip and acetone or ideally a nail polish remover pen if you have one to clean up any nail polish left outside the nail. Make sure the nail polish dries all the way before using the nail pen. This is important, because if you don't, the nail pen might smudge or make holes and dents in the colored layer and you'll have to repaint that nail and wait longer for it to dry.
6.Start designing. You can use the nail pen to make small dots to form into simple hearts, flowers, or letters or use it for stripes and other designs. Be creative, but don't try too hard to make something complex for your first few attempts at using the nail pen. Simple little patterns can go a long way.
7.Let the nail pen designs dry and use a top coat. Adding a clear coat on top of any type of manicure will keep the color and design sealed, protecting your work while giving it a shiny finish.
8.Finished.

Create hot, fun and unique designs on your nails right at home with Hot Designs™ nail art pens!  These specially formulated nail art pens allow you to create a base color and then apply unique, precision designs for a modern and stylish look on your nails!   Use Hot Designs™ nail art pens to create unique designs including dots, stripes, rainbows or whatever else you may desire!  Each kit comes with a Design Guide including great styles to try at home, or feel free to get creative and make unique designs on your own!  It's fun to use, easy to remove and it will make your nails look better than ever!   Try Hot Designs™ nail art pens today!

• Unique pens allow you to brush on a base color, pop the top, and then create amazing designs using the innovative and revolutionary pen tip.
• Includes 12 colors to create unique designs that will impress everyone!
• Bonus Design Guide provides you with creative ideas and inspiration to create your own!

Nail Art Pen Nail Art Designs Ideas Tutorial Step By Step Images Christmas Flowers Pictures 2015